
Jason Keefer
President
Concrete Crack Repair Epoxy
Table of Contents
Essential Guide to Concrete Crack Repair Epoxy
For effective structural repairs in concrete structures, concrete crack repair epoxy is essential. This two-component, low-viscosity system, injected under pressure, bonds and seals cracks as narrow as 0.002 inches, restoring structural integrity per Texas Department of Transportation guidelines.
The epoxy crack injection process follows authoritative state transportation agency procedures:
- Clean crack, drill for ports at intervals.
- Seal surface with TxDOT Type V/VII epoxy.
- Inject from bottom up until refusal at adjacent ports.
We at Helical Technology highlight its high bond strength and moisture tolerance for bridges, highways, and parking structures. Unlike polyurethane crack injection, it provides permanent structural bonding. Handle resins and hardeners with care; ideal for dry or damp cracks wider than 0.004 inches.
Explore top crack repair products for epoxy application.
1. Maximize Bond Strength with Epoxy
Weak bond strength undermines concrete crack repairs, allowing water infiltration and structural degradation as noted in prior discussions on crack formation. We at Helical Technology prioritize concrete crack repair epoxy for its high tensile strength up to 12,000 psi and 100% solids formulation, ensuring full crack penetration and maximum substrate adhesion.
Maximize bonds with these Texas Department of Transportation-guided steps for pressure-injected epoxy:
- Prepare the crack: V-groove to 1/4 inch width x 1/4 inch depth, sandblast clean, install entry ports every 8 inches, and apply surface seal.
- Select materials: Use low-viscosity, injection-grade epoxy per authoritative state guidelines.
- Inject epoxy: Start at lowest port, apply 20-40 psi upward, maintain 10 psi positive pressure until refusal.
- Cure and finish: Allow gel time of 20-45 minutes, grind excess.
Epoxy crack injection restores full structural integrity, outperforming polyurethane crack injection for active leaks, with highway failure rates under 5%. For bonds exceeding concrete’s strength, we recommend high-modulus structural repair epoxy.
While epoxy excels in strength, flexible options follow for dynamic conditions.
2. Prepare Cracks for Optimal Injection
After assessing cracks, proper preparation ensures optimal concrete crack repair epoxy results. We emphasize cleaning, drying, and securing cracks for strong adhesion during epoxy crack injection or polyurethane crack injection. Wear gloves and eye protection throughout.
- Remove loose debris: Vigorously brush cracks with a stiff wire brush. Follow with compressed air or a vacuum to eliminate dust and contaminants.
- Flush residues: Rinse cracks with clean water or acetone to dissolve oils. Allow complete drying.
- Route wider cracks: Use a grinder to V-groove cracks over 1/4-inch wide, creating ideal injection pathways.
- Install mechanical anchors: Drill 1/2-inch holes perpendicular to the crack every 12 inches. Insert a concrete crack lock kit for superior bond strength.
- Verify dryness: Wait 24-48 hours after water flush or until tack-free after solvent. Never inject wet or contaminated cracks to avoid failure.
Prepared cracks now enable precise concrete crack repair epoxy or polyurethane injection for lasting foundation repair solutions.
3. Seal with Low-Pressure Techniques
Once cracks are clean and dry, proceed to seal with low-pressure techniques in concrete structures. This approach using concrete crack repair epoxy minimizes structural stress while ensuring strong bonding and waterproofing, ideal for active cracks in slabs or walls.
At Helical Technology, we follow procedures adapted from Texas Department of Transportation guidelines for effective low-pressure application:
- Install injection ports along cleaned cracks at 6-12 inch spacing, securing with epoxy paste and testing adhesion.
- Inject low-viscosity structural injection epoxy at 10-20 psi sequentially from one end, confirming flow through adjacent ports; opt for polyurethane crack injection for water-active leaks.
- Seal surfaces with epoxy paste over ports and crack edges post-injection, allowing full cure.
These epoxy crack injection methods reduce damage risks versus high-pressure options. Test port adhesion and oven-dry if moisture persists for optimal results. Next, explore quality checks or high-pressure alternatives.
4. Reinforce Using Crack Stitches
Once the crack is cleaned and injected, we reinforce it structurally using a crack stitch kit. Crack stitches consist of stainless steel bars inserted into slots cut across the crack and bonded with concrete crack repair epoxy for superior tensile strength and long-term durability in demanding applications.
Tools required:
- Angle grinder with diamond blade
- Compressed air and wire brush
- Epoxy grout mixer and applicator
Follow these five steps for installation:
- Mark the crack path and cut 1-inch deep slots at 45-degree angles every 12 inches along the crack.
- Clean slots thoroughly using compressed air and a wire brush to remove debris.
- Insert the pre-packaged crack stitch components, including stainless steel bars, into the slots.
- Mix concrete crack repair epoxy per manufacturer specifications. Warning: Wear gloves and eye protection during mixing and application.
- Apply epoxy grout to fully bond the stitches, ensuring complete embedment.
Crack stitches offer up to 10,000 lbs load-bearing capacity per stitch, providing tensile reinforcement that complements epoxy crack injection for sealing voids or polyurethane foam injection for active leaks. Consult our engineering team for project-specific guidance. With crack stitches in place, monitor the repair and apply surface sealing as outlined next.
5. Budget for Injection Costs
Once you’ve selected epoxy crack injection or polyurethane crack injection, budgeting is next for your concrete crack repair epoxy project. Accurate cost planning ensures successful repairs without surprises, covering materials, labor, equipment, and extras.
Materials form the core expense: epoxy at $50-100 per gallon for structural strength, polyurethane at $40-80 per gallon for waterproofing. We recommend opting for products like high strength epoxy adhesive for reliable results in demanding applications. Labor runs $75-150 per hour, typically 2-4 hours per job. Equipment rental, such as pumps, costs $200-500 daily, while permits and miscellaneous add $100-300.
Costs vary by crack length and depth, accessibility, and material choice–epoxy offers higher upfront costs but long-term durability savings over polyurethane crack injection. For a 50-foot crack, expect a total of $1,200-2,500.
Add a 20% contingency for issues like void filling. With budget set, proceed to preparation steps carefully.
6. Compare Epoxy to Polyurethane
Building on epoxy’s superior bonding power and polyurethane’s expansion properties, concrete crack repair epoxy excels in structural bonding while polyurethane offers flexibility for active cracks. This comparison highlights key differences to guide your choice.
Here are the main distinctions:
- Structural Strength: Epoxy provides 10,000+ psi tensile strength, ideal for load-bearing repairs; polyurethane ranges from 1,000-3,000 psi per industry standards.
- Flexibility: Polyurethane handles moving cracks and expansion joints better; epoxy remains rigid.
- Cure Time: Epoxy cures slower for permanent bonds; polyurethane expands quickly as foam.
- Water Tolerance: Polyurethane manages moisture effectively; epoxy requires dry conditions.
- Cost: Epoxy costs more upfront but lasts longer.

Epoxy vs polyurethane crack repair comparison infographic
For dormant cracks under 1/4-inch, choose epoxy crack injection; for wider or moving cracks, opt for polyurethane crack injection. Epoxy suits permanent rigid repairs; polyurethane excels in waterproofing and flexibility. These differences guide material choice based on crack type–see section 7 for assessment tips.
7. Follow Permanent Repair Steps
After temporary measures like polyurethane crack injection hold the crack, advance to permanent concrete crack repair epoxy using pressure injected epoxy. This process, outlined by the Texas Department of Transportation as authoritative state guidelines for highway bridge repairs, restores structural integrity.
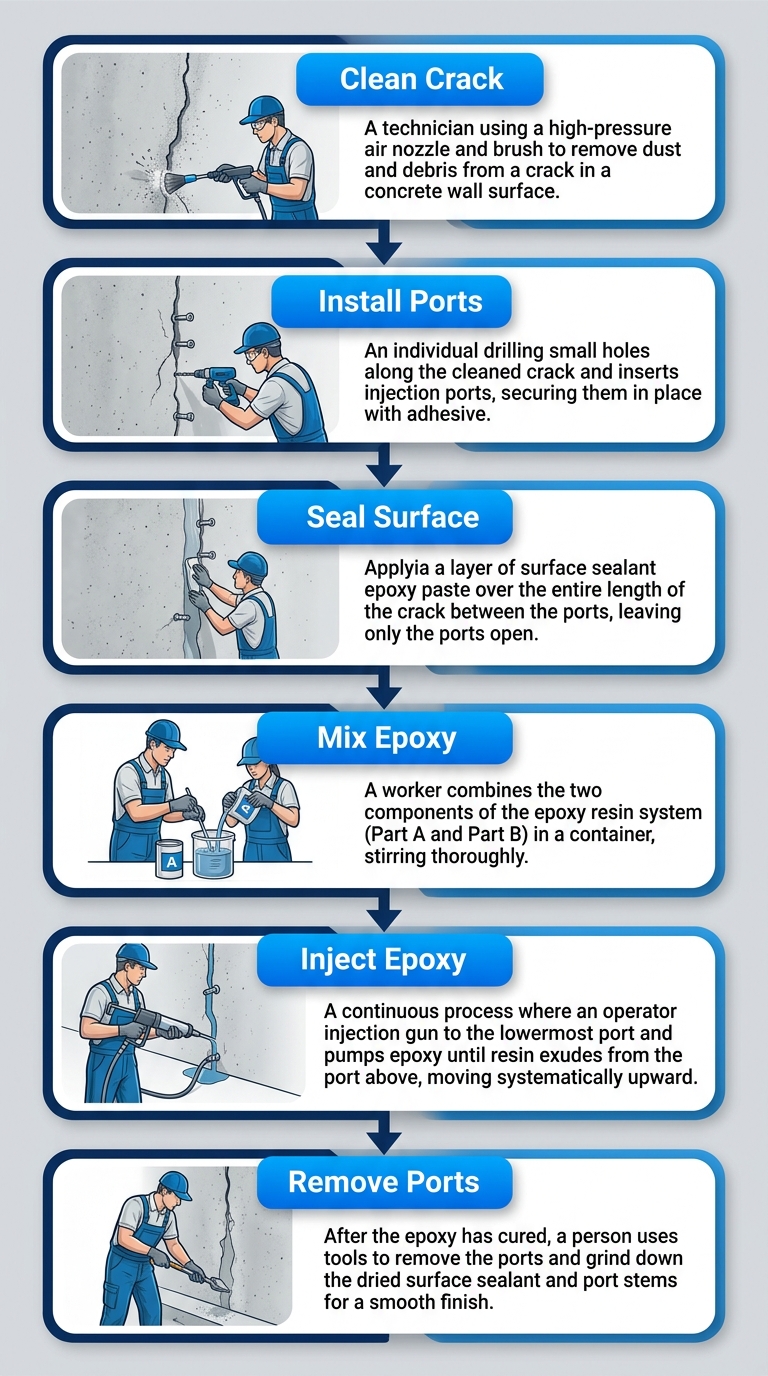
Six-step vertical process for permanent epoxy concrete crack repair
Follow these steps for effective epoxy crack injection:
- Prepare the crack: Clean thoroughly with wire brush, vacuum, or compressed air to remove dirt, debris, and loose concrete. Dry completely, as per TxDOT guidelines.
- Install injection ports: Place ports every 6-12 inches along the crack using epoxy adhesive. Ensure secure bonding and perpendicular alignment.
- Seal the surface: Apply low-viscosity epoxy sealant over the crack between ports, leaving inlets open.
- Mix epoxy resin: Combine two-component, low-viscosity epoxy per manufacturer ratios.
- Inject epoxy: Start at the lowest port, apply steady pressure (20-40 psi) until gel appears at the next port, progressing upward.
- Finish the repair: After 24-48 hours cure, grind ports flush and patch the surface.
Safety notes:
- Wear PPE and ensure ventilation.
- Avoid injecting into active leaks.
- Consult our engineering team at Helical Technology for project-specific guidance.
Monitor for 7 days post-cure before full loading to verify performance.
8. Source from Trusted Suppliers
With quality products sourced properly following material preparation, your foundation and concrete repair projects achieve lasting durability. We recommend obtaining concrete crack repair epoxy from trusted suppliers to ensure superior performance in demanding applications.
Here are key steps to vet suppliers effectively:
- Verify supplier certifications such as ISO 9001 or ASTM compliance for epoxy products, confirming adherence to industry standards.
- Review the supplier’s track record through case studies of successful epoxy crack injection projects that demonstrate proven results.
- Evaluate product datasheets for critical specs like viscosity, cure time, and tensile strength in concrete crack repair epoxy.
- Check third-party lab testing results for polyurethane crack injection materials to validate bond strength and flexibility.
- Negotiate bulk pricing and delivery timelines directly, ensuring project timelines align with your needs.
- Avoid unverified online marketplaces that risk counterfeit epoxy; prioritize established distributors instead.
- Contact suppliers pre-purchase to confirm technical support availability for application guidance.
Trusted suppliers often provide installation guides, easing the transition to precise application. Contact certified suppliers today for your project needs.
Achieve Lasting Foundation Stability
Once cracks are assessed, implement proven repairs like concrete crack repair epoxy to restore structural integrity. At Helical Technology, we supply low-viscosity epoxies that bond stronger than concrete’s tensile strength, sealing hairline cracks from 0.002 to 0.25 inches against moisture ingress, as per Texas Department of Transportation guidelines.
Epoxy crack injection begins with routing cracks to 1/4-1/2 inch width, cleaning thoroughly, and sealing with epoxy paste. Install injection ports 8-12 inches apart using epoxy adhesive, then inject from bottom up at 20-100 psi until refusal. This process outperforms polyurethane crack injection for dry structural cracks.
Post-injection, cure 24-48 hours at 50-90°F for monolithic behavior. Pair with our helical piers for comprehensive stability and long-term monitoring.
This article was researched and written with the assistance of AI tools.